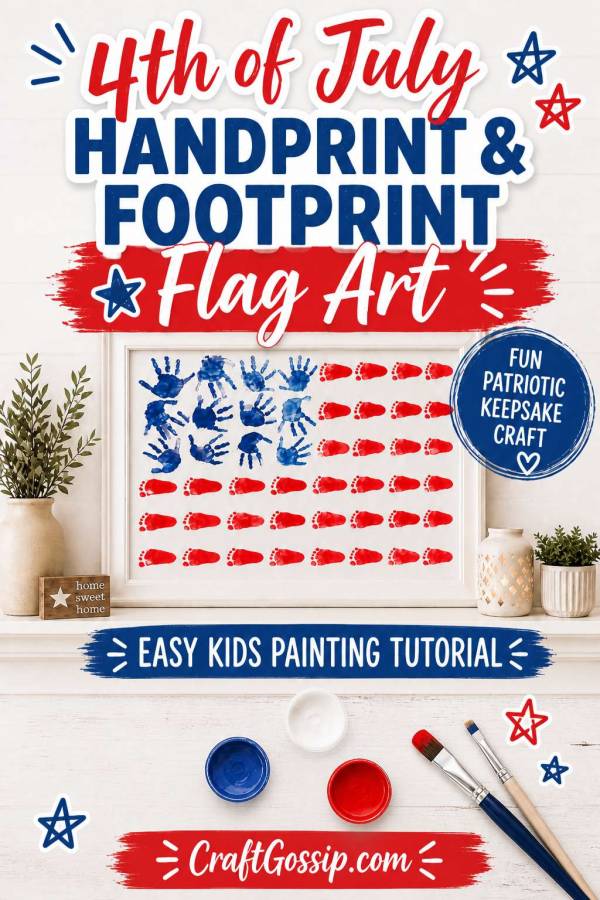
This handprint and footprint flag painting is a sweet, messy, memory-making craft for the Fourth of July. Kids use blue handprints for the star section of the flag and red footprints for the stripes, creating a bold patriotic artwork that can be framed and displayed for Independence Day, Memorial Day, Veterans Day, or any red, white, and blue celebration.
It is especially lovely as a family keepsake because the little handprints and footprints become part of the finished flag. Use one child’s prints for a smaller version, or let siblings, cousins, or a whole classroom help create a larger collaborative piece.
Supplies
Large sheet of white poster board, canvas, or heavy art paper
Red washable paint
Blue washable paint
Foam brushes or paper plates for paint
Baby wipes or a damp cloth
Old towel or drop cloth
Painter’s tape, optional
White frame, optional
Newspaper or plastic table covering
Aprons or old clothes
Step-by-Step Instructions
1. Prepare your work area
Cover the table or floor with newspaper, a plastic tablecloth, or an old towel. This is definitely a hands-and-feet craft, so choose a spot that is easy to clean.
Place baby wipes, damp cloths, and a towel nearby before you start painting. It helps to have everything ready so little feet are not wandering around the house covered in red paint.
2. Set up your paper or canvas
Lay your white poster board, canvas, or heavy art paper flat on the covered surface.
For a clean framed look, you can use painter’s tape around the edges to create a neat white border. Press the tape down firmly so paint does not seep underneath.
3. Paint the blue handprint section
Pour a small amount of blue washable paint onto a paper plate.
Using a foam brush, paint the child’s hand with an even layer of blue paint. Press the hand onto the upper left corner of the paper to create the blue section of the flag.
Repeat with more blue handprints until the top-left corner is filled. You can overlap them slightly or place them in neat rows, depending on the size of your paper and the age of the child.
For a classroom or sibling version, let each child add one blue handprint.
4. Clean hands before moving on
Wipe the child’s hand clean with baby wipes or a damp cloth before switching colors. This keeps the blue and red paint from smudging together.
Let the blue area dry for a few minutes if needed.
5. Create the red footprint stripes
Pour red washable paint onto a clean paper plate.
Use a foam brush to paint the bottom of the child’s foot with red paint. Carefully press the foot onto the paper in a horizontal line, starting near the left side and working toward the right.
Repeat the footprints in straight rows from left to right to create the red stripes of the flag. Leave white space between each row so the white background becomes the white stripes.
For a neater flag design, keep the toes facing the same direction each time.
6. Work in rows
Continue adding red footprints in horizontal rows across the paper.
You can make three or four red footprint rows, depending on the size of your canvas. Try to keep each row fairly straight so the finished artwork looks like a flag.
Tip: For younger kids, an adult can gently guide the foot down and lift it straight back up to prevent sliding or smearing.
7. Let the artwork dry completely
Place the finished flag somewhere flat and safe to dry. Drying time will depend on how much paint was used, but most washable paints dry within an hour or two.
Avoid framing the artwork until it is completely dry.
8. Add finishing details
Once dry, you can leave the flag exactly as it is, or add a few simple details.
You might write the child’s name and age in the bottom corner, add the year, or write “Fourth of July” on the back. You can also add small white star stickers over the blue handprint area if you want a more traditional flag look.
9. Frame and display
Place the finished artwork in a white frame for a clean, bright patriotic display. It looks lovely on a mantel, entry table, classroom wall, or holiday party setup.
This makes a beautiful keepsake to bring out year after year.
Helpful Tips
Use washable paint only, especially when working with younger children.
Have wipes ready before you begin.
Do the handprints first, then the footprints.
Let kids sit in a chair while you paint and press their feet to avoid slipping.
Use a large canvas if multiple children are contributing.
Add painter’s tape around the edges if you want a crisp border.
Craft Variation
For toddlers or preschoolers, make a smaller version using only one blue handprint and a few red footprints. For a family version, use different-sized handprints and footprints from each child to create a more personal patriotic keepsake.


very cute and clever! What a fun craft to do with kids!