• Home
  • Suggest A DIY
  • DIY Newsletter

Lesson Plans

Ideas and resources

  • About CraftGossip
  • Our Network
    • Bath & Body Crafts
    • Candle Making Ideas
    • Crochet Ideas
    • Cross Stitch
    • Edible Crafts
    • Felting Patterns
    • Glass Art
    • Home & Garden Ideas
    • Indie Crafts
    • Jewelry Making
    • Kids Crafts
    • Knitting Patterns
    • Lesson Plans
    • Needlework
    • Party Ideas
    • Polymer Clay
    • Quilting Ideas
    • Recycled Crafts
    • Scrapbooking
    • Sewing Patterns
    • Card Making
    • DIY Weddings
    • Not Craft Ideas
  • Giveaways
  • Roundups
  • Store
  • Search

Marshmallow Ghost

October 14, 2016 by Kristen Stephens Leave a Comment

No Time For Flashcards shows a great ‘ fine motorskills’ craft perfect to pair up with a Halloween book.  This marshmallow ghost iwll be fun for all participants! (Can you tell I like marshmallows?)

Check out more fall fun with these roundups:

Bat Crafts and Learning Activities

Pumpkin Learning Activities

Fall Learning Activities

Apple Learning Activities

Check out these Halloween Activity Books  we found on Amazon to keep the kids busy this Halloween season. The perfect grab and go books for outings, car trips and lazy afternoons.
 

«
»

Have you read?

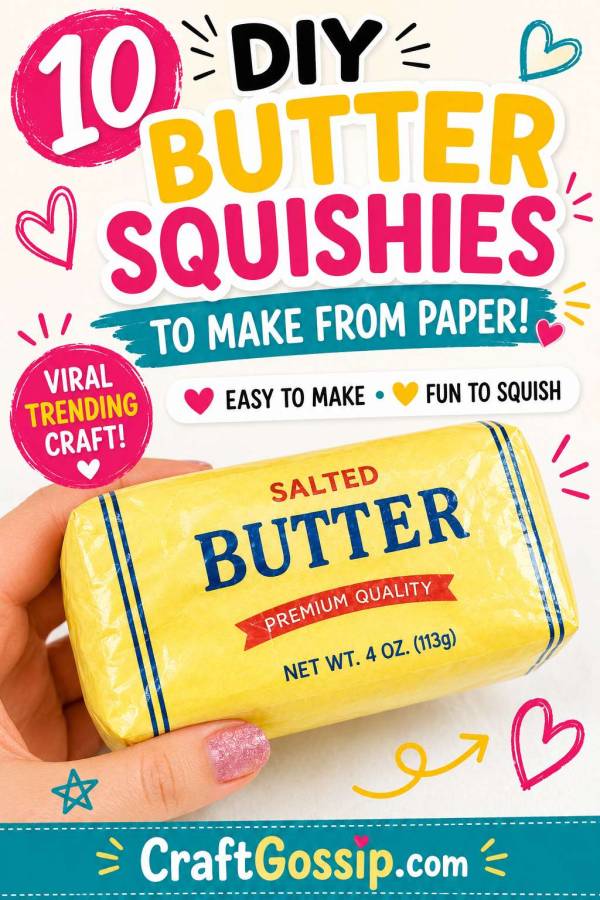
10 DIY Butter Squishies To Make From Paper

I must admit, a squishy block of butter was not on my crafty prediction list for 2026. Yet here we are, surrounded by teenagers turning ordinary paper, tape and stuffing into shiny little butter bricks—and honestly, they are rather adorable.

The viral butter squishy trend takes the familiar paper squishy craft and gives it a wonderfully silly supermarket makeover. Most versions are shaped like a wrapped stick or block of salted butter, complete with pretend branding, weight labels and a yellow centre that can be squeezed, flattened and allowed to puff back into shape.

They are inexpensive to make, require very few specialist supplies and are easy to customise. You can make a traditional salted butter squishy, a miniature butter stick, a brightly coloured butter block or an enormous version that looks as though it belongs in a giant’s refrigerator. Some makers even create an outer paper wrapper so the butter can be dramatically “unwrapped” before it is squished.

If you have been searching for how to make a butter squishy, these direct video tutorials include beginner paper versions, giant butter squishies, tiny butter squishies, no-glue projects and one clever version that does not require cotton filling.

The important thing to know is that these are pretend butter toys. Please do not fill one with actual butter unless you fancy discovering a warm, greasy surprise in the bottom of a school bag.

What Is A Butter Squishy?

A butter squishy is a homemade fidget toy designed to resemble a wrapped block or stick of butter. The popular paper version is usually made by drawing or printing a butter design, covering the paper with clear tape, joining the edges and filling the centre with something soft.

Common fillings include toy stuffing, cotton wool, tissue paper, clean plastic bags, sponge offcuts and scraps of soft foam. Each filling creates a slightly different texture, so it is worth experimenting with materials you already have at home.

Clear tape acts as a simple homemade laminate. It protects the drawing, gives the butter wrapper its familiar glossy finish and helps prevent the paper from tearing during repeated squeezing.

Supplies For Making A Paper Butter Squishy

Most of these DIY butter squishy tutorials use:

  • White or yellow printer paper
  • Pencils, markers or coloured pencils
  • Clear packing or cello tape
  • Scissors
  • Soft toy stuffing, cotton wool or tissue
  • A ruler
  • Double-sided tape or a glue stick, depending on the method

Wide clear packing tape generally makes the covering process quicker because fewer strips are needed. Ordinary stationery tape still works, but you may need to overlap more pieces to cover the entire design.

Viral DIY Butter Squishy Tutorials

Viral Butter Squishy Made With Paper

This tutorial shows how to make the familiar viral butter block using coloured paper, clear tape and markers. It is a useful place to begin because the materials are simple and the rectangular butter shape is much less fiddly than detailed animal paper squishies.

You could copy the classic salted-butter packaging look or invent your own label. I rather like the idea of adding something cheeky such as “Emergency Crafting Butter” or “Contains 100% Unfinished Projects.”

Easy Butter Paper Squishy Tutorial

This video demonstrates a soft, slow-rising butter squishy made from ordinary craft materials. The clear presentation makes it a good option for beginners who want to see how the flat paper pieces are turned into a filled butter block.

Take your time when sealing the corners. Butter squishies may have simple shapes, but the corners are usually the first spots to open if the tape has not been pressed down firmly.

Viral Butter Squishy Without Cotton

No cotton wool or toy stuffing hiding in the craft cupboard? This tutorial shows an alternative way to make a soft butter squishy without cotton filling. It is particularly handy for an impulsive afternoon craft when everyone wants to begin immediately and nobody wants to wait for a trip to the shops.

Alternative fillings can also create different sounds and textures. Lightly crumpled plastic tends to produce more of a crunchy paper-squishy feel, while soft sponge or foam produces a gentler bounce.

Beginner Viral Butter Paper Squishy

This beginner-friendly butter paper squishy uses simple materials and follows the recognisable viral design. It is a good choice for children or adults attempting their first homemade paper squishy because there are no awkward ears, limbs or tiny pieces to align.

The finished butter does not need to be perfectly rectangular. A slightly puffy edge or crooked label only makes it look more charmingly handmade.

Butter Squishy From A4 Paper

This project begins with an ordinary sheet of A4 paper, making it practical for classrooms, school holiday craft sessions and rainy afternoons at home. It walks through creating the butter shape without needing a specialist printable or purchased kit.

A ruler will help keep the wrapper straight, but there is no need to become too precious about the measurements. Once the butter is stuffed and squeezed a few times, tiny imperfections become far less noticeable.

No-Glue Butter Paper Squishy

This no-glue butter squishy tutorial uses an origami-inspired paper method and tape rather than wet adhesive. That means less waiting, fewer sticky fingers and no mysterious glue smears appearing on the dining table three days later.

It is also a sensible option for group crafting because you do not need to allow time for glued seams to dry before adding the stuffing.

Mini Butter Squishy Made With Sponge

Rather than relying entirely on paper stuffing, this miniature butter squishy uses sponge, double-sided tape and glitter. The sponge centre creates a different type of squish and may stand up to repeated squeezing better than a lightly stuffed paper version.

Mini butter squishies would make cute bag charms or additions to a collection of tiny food crafts. Keep in mind that small handmade pieces are unsuitable for very young children who may put them in their mouths.

Tiny Butter Squishy Without Foam

This tutorial takes the butter trend in the opposite direction by creating an extremely tiny butter squishy without foam. It is exactly the sort of project teenagers seem to love—unnecessarily miniature, slightly ridiculous and completely irresistible.

Small squishies require less stuffing, but the edges can be fiddlier to tape. Fine scissors and narrow pieces of tape make the assembly easier.

Multicoloured Mini Butter Squishies

Who says butter has to be yellow? This tutorial makes a collection of colourful mini butter squishies from paper, giving the trend a brighter and more playful twist.

Try pastel colours, rainbow wrappers or different pretend flavours. Pink strawberry butter, green herb butter and purple berry butter would make a wonderfully cheerful set.

Giant DIY Butter Squishy

For those who believe every craft can be improved by making it unnecessarily enormous, this tutorial creates a giant paper butter squishy. Multiple sheets of yellow paper are taped together to form a large glossy surface before the butter is assembled and filled.

A giant butter squishy would be wonderfully funny for a party prop, bedroom cushion or craft-room decoration. Just be prepared to use considerably more tape and filling than you would for the palm-sized versions.

How To Make A Basic Paper Butter Squishy

Although each tutorial uses a slightly different approach, the basic process is wonderfully straightforward.

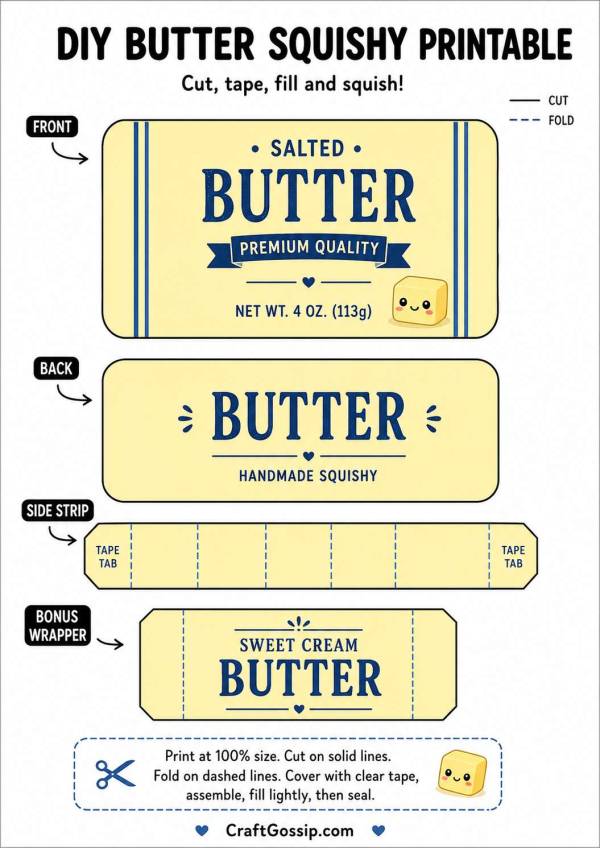
Begin by drawing two matching butter-block shapes on paper. You can draw them separately or fold the paper in half and cut both layers together so the shapes match.  Or Print our downloadable image below. 

Decorate the front with a butter label before adding the tape. Popular details include:

  • Salted butter
  • Unsalted butter
  • Net weight markings
  • Little measurement lines
  • A pretend dairy logo
  • A barcode
  • A smiling kawaii face

Cover both sides of each paper shape with overlapping strips of clear tape. Smooth the tape from the centre towards the outside to reduce wrinkles and trapped air bubbles.

Place the two shapes together and tape around the edges, leaving a small opening along one side. Add your chosen filling a little at a time, spreading it into the corners as you work.

The butter should look full without becoming firm. If it feels like a paper-covered brick, you have probably added too much stuffing.

Seal the remaining opening and reinforce any weak corners with an extra piece of clear tape. Give it a gentle test squeeze before handing it over to an enthusiastic child who may immediately attempt to flatten it into a pancake.

What Can You Use To Fill A Butter Squishy?

Toy Stuffing

Polyester toy stuffing creates a soft, lightweight butter squishy. Pull it into small wispy pieces before inserting it so it spreads more evenly and does not leave large lumps.

Cotton Wool

Cotton wool is easy to find and works well for miniature butter squishies. Avoid packing it too tightly, as compressed cotton can become surprisingly firm.

Tissue Paper

Soft tissue paper makes an inexpensive filling and can be fluffed before being inserted. It creates a slightly crinkly texture and is useful when you want to make the project entirely from common household supplies.

Clean Plastic Bags

Thin plastic bags can be cut or torn into small pieces and lightly scrunched. They create a more noticeable crunchy sound, which some paper-squishy fans find particularly satisfying.

Sponge Or Memory Foam

Small sponge pieces create a springier squishy that returns to shape more quickly. Memory foam will generally produce a slower rise, although it can be more difficult to squeeze neatly into the corners of a paper butter block.

How To Make A Butter Squishy Slow-Rising

The filling and the amount you use will determine how quickly the butter returns to shape.

For a softer, slower result, use small pieces of memory foam or very lightly packed toy stuffing. Leave enough empty space for the filling to compress when the butter is squeezed.

For a faster bounce, use sponge pieces or slightly more stuffing. Be careful not to overfill it, as tightly packed filling can place pressure on the taped seams and cause them to split.

A paper squishy will not behave exactly like a commercially moulded slow-rise foam toy, but experimenting with different fillings is part of the fun.

Butter Squishy Wrapper Ideas

A separate wrapper makes the finished butter squishy even more entertaining. Cut a larger rectangle of paper, decorate it like vintage butter packaging and fold it around the finished block.

Try creating:

  • Vintage farmhouse butter packaging
  • Pastel kawaii butter wrappers
  • Strawberry or honey butter
  • Halloween “bat butter”
  • Christmas baking butter
  • Rainbow unicorn butter
  • Miniature supermarket-style labels
  • Personalised butter bearing the maker’s name

Do not tape the wrapper directly to the squishy if you want to remove and replace it. Instead, tape the wrapper into a loose sleeve that slides over the butter block.

Tips For Making Paper Squishies Last Longer

Completely cover the paper with tape rather than protecting only the front design. Untaped sections absorb moisture from hands and tear much more quickly.

Overlap each strip of tape slightly. Even a narrow exposed gap can become a weak line once the squishy is repeatedly folded and pressed.

Round the paper corners very slightly before taping. Sharp corners tend to poke through or peel away from the tape.

Do not overfill the squishy. It should compress easily without making the seams bulge.

Inspect the toy regularly and add more tape as soon as an edge begins to lift. Once a seam has torn completely, loose filling tends to escape everywhere—and somehow always when nobody has time to clean it up.

More Homemade Squishy Balls And Fidget Toys

Once the butter has taken over the craft table, try some of these homemade stress-ball projects from our sister site, CraftBits.

The balloon critter fidget stress balls turn flour-filled balloons into funny little characters with wool hair and expressive faces.

These DIY water bead stress balls use hydrated beads inside balloons to create a colourful, tactile squishy toy.

The classic balloon stress balls use birdseed and layered balloons, with holes cut into the outer layer so contrasting colours peek through.

You can also link this section to our full DIY Squishy Balls And Toys roundup once it is published:

See all of our DIY squishy balls and homemade squishy toys.

Homemade squishies are not meant to last forever, but that is hardly a tragedy when the supplies are inexpensive and making a replacement is just as enjoyable as squeezing the first one.


Leave a Reply

Your email address will not be published. Required fields are marked *

Categories

Art Christmas Classroom Craft by Holiday Craft Inspirations DIY Tutorials and Patterns Elementary Games General Homeschool Kids Crafts Lesson Plan Activities & Ideas Math Nature PreSchool Printables Science Craft STEM & STEAM Toddler Tween

RSS More Articles

  • Designer Spotlight: Lifted Spirit Patterns
  • How to Print Vintage Junk Journal Pages at Home Like a Pro
  • Sewing Pattern Saturday Review: Raman Dress Sewing Pattern (PDF)
  • Crochet Flower Bouquet Blanket Pattern With Rosebuds, Sunflowers and Wildflowers
  • 15 Western Knitting Patterns For Modern Line Dancers And Cowgirls
  • 12 DIY Squishy Balls And Toys You Can Make At Home
  • 12 Snoopy Crochet Patterns For Peanuts Fans
  • Apple Pie Dessert Soap Recipe With Whipped Soap Topping
  • Make a Tropical Fish Card with Multicolored Stamping
  • How to Sew a Patch on a Hat by Hand or Machine

Pick Your Blog

  • Sewing
  • Knitting
  • Quilting
  • Crochet
  • Home & Garden
  • Recycled Crafts
  • Scrapbooking
  • Card Making
  • Polymer Clay
  • Cross-Stitch
  • Edible Crafts
  • Felting
  • Glass Art
  • Indie Crafts
  • Kids Crafts
  • Jewelry Making
  • Lesson Plans
  • Needlework
  • Bath & Body
  • Party Ideas
  • Candle Making
  • DIY Weddings
  • Not Craft
  • Free Craft Projects

Copyright © 2026 · CraftGossip | Start Here | Contact Us | Link to Us | Your Editors | Privacy and affiliate policy