
This is a great DIY craft project for teenagers and also for gifts for dads. The tutorial is easy to follow and can be found here. You can pick up flash drives cheap after Back to school sales.
Ideas and resources
This is a great DIY craft project for teenagers and also for gifts for dads. The tutorial is easy to follow and can be found here. You can pick up flash drives cheap after Back to school sales.
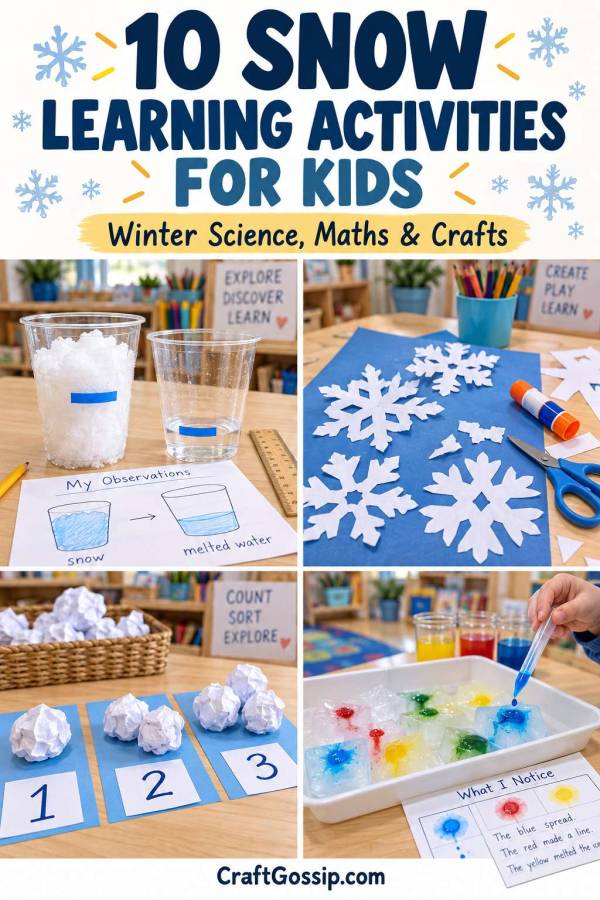
Snow has a wonderful way of making children curious. Why does it melt on your hand? How can a whole bowl of fluffy snow turn into such a small puddle? And why does some snow make a brilliant snowman while other snow refuses to stick together?
Those questions are a lovely starting point for snow learning activities for kids. You don’t need an elaborate lesson plan or a cupboard full of science equipment. A clear container, some paper, a few crayons and time to investigate can turn a winter afternoon into something rather interesting.
Here in Queensland, snow isn’t exactly something we can scoop up from the back garden. Thankfully, there are plenty of ways to explore a snow theme without waiting for a snowy holiday. Paper snowflakes, ice experiments and winter writing activities give children something to make, observe and talk about wherever they live.
I’ve brought together a mixture of snow science experiments, preschool snow activities, winter maths ideas and snowflake crafts. Some use real snow, while others work indoors with everyday supplies. There are options for preschoolers through to primary-school children, with simple ways to adjust the challenge.
My favourite approach is to start with a question rather than an explanation. Let children predict what might happen, try the activity and describe what they notice. A surprising result is often much more memorable than being told the answer beforehand.
For preschoolers, begin with naming colours, counting small groups, noticing changes and describing textures. Primary-school children can add measurements, written predictions, labelled drawings and comparisons.
You can make most of these activities easier simply by doing them together. A child who isn’t writing yet can tell you their prediction while you jot it down, or draw what they see instead.
Keep wet experiments on a tray, supervise scissors and small materials, and treat collected snow as an experiment material rather than something to eat.
The melting-snow experiment from KC Edventures is a wonderfully simple introduction to predicting, measuring and observing. Children collect snow in a clear container, mark its starting level and compare it with the water left after melting. Before you begin, ask everyone to predict the final water level—I suspect a few grown-ups will be surprised too.
Suggested age: Preschool with adult help; primary school for measuring.
Try this learning extension: Use matching containers to compare loosely scooped snow with more tightly packed snow. Label them clearly and keep them in the same place while they melt.
Snow contains spaces filled with air, so a container of snow usually produces a much smaller volume of liquid water. The result varies with the snow and how it was packed; there isn’t one fixed ratio every child should expect to find.
The snow colour-mixing activity from Living Life and Learning turns a snowy day into a hands-on art investigation. I like the opportunity to slow down and watch colours meet, rather than rushing straight to the finished picture. Ask children what they think two colours will make, then compare their prediction with what actually appears.
Suggested age: Preschool and early primary.
Try this learning extension: Begin with two colours at a time and record the combinations on paper. A simple page of coloured circles makes a useful reminder of what the children discovered.
No snow available? Try dripping coloured water onto ice cubes in a shallow tray. It offers another way to observe colour mixing, although the texture and behaviour will differ from snow.
This fizzy snowman experiment from Living Life and Learning brings a snowman theme to a bubbling science activity without requiring real snow. It’s a good choice for children who enjoy a dramatic change they can see straight away. Follow the tutorial’s quantities and setup, then encourage children to describe the fizzing before explaining the reaction.
Suggested age: Preschool as a closely supervised activity; primary school for discussing the science.
Try this learning extension: Draw the snowman before and after the experiment. Older children can add a sentence explaining what changed.
When baking soda and vinegar react, they produce carbon dioxide gas. Those bubbles are evidence of a chemical reaction, making this a different investigation from simply watching snow melt.
The snowstorm-in-a-jar experiment from Taming Little Monsters uses oil, water, white paint and an effervescent tablet to create moving white droplets. It’s an eye-catching indoor activity for noticing liquid layers and watching bubbles carry droplets upwards. I’d set this up as an adult-led demonstration, with children predicting what will happen at each stage.
Suggested age: Kindergarten and primary school, with an adult handling the materials.
Try this learning extension: Ask children to draw the layers before adding the tablet, then add arrows showing the movement they observe.
This models the appearance of swirling snow rather than the way snow forms in clouds. Keep the container open during the reaction, and keep the tablet and other materials away from children’s mouths.
The paper snowflake-building activity from Kitchen Counter Chronicle provides a creative starting point for exploring six-sided shapes and branching patterns. Children arrange paper pieces around a central hexagon, making it especially useful for counting and discussing how a design repeats. I’d introduce it as a paper model, then compare the finished artwork with photographs of real snow crystals.
Suggested age: Preschool with prepared pieces; primary school for independent arranging and cutting.
Try this learning extension: Count the six main arms, then challenge children to repeat the same arrangement on each one.
For a child-friendly science explanation, say that snow crystals grow as water vapour becomes ice in cold clouds. Their sixfold structure comes from the way water molecules arrange themselves in ice.
The paper snowflake tutorial from CraftBits is a lovely way to connect a familiar winter craft with shape and pattern. Folding and cutting create repeated openings, and unfolding the paper gives children that satisfying little moment of surprise. Let younger children help with unfolding and comparing while an adult handles thick folds or tricky cuts.
Suggested age: Early primary and older, with help as needed.
Try this learning extension: Before unfolding, ask children to predict where the holes will appear. Afterwards, compare the repeated shapes around the snowflake and look for matching sections.
There’s no need for every attempt to become a perfect decoration. An unexpected cut gives you something new to investigate.
The snowflake formation booklet from Mama’s Learning Corner is a paid printable resource with two booklet versions, vocabulary practice and writing pages. It’s aimed at kindergarten through third grade and would suit children who enjoy cutting, assembling and explaining a sequence. I like using a booklet after a practical activity, when children have something they’re keen to talk about.
Suggested age: Kindergarten to approximately Year 3, adjusting the writing expectations.
Try this learning extension: Invite children to explain each page aloud before writing. Younger learners can dictate a sentence, while older children can add labels and their own questions.
Although the resource uses “life cycle” in its title, explain that snowflakes aren’t living things. The pages describe how snowflakes form and change.
For a quick homemade preschool snow maths activity, scrunch scrap white paper into pretend snowballs and draw several large circles on a sheet of paper. Write a number inside each circle and invite children to place that many snowballs beside it. Start with numbers one to five, increasing the challenge only when your child is comfortable.
Suggested age: Preschool and kindergarten.
Try this learning extension: Compare two groups and ask which has more, which has fewer and how you could make them equal. Older children can combine two groups to explore addition.
Use generously sized paper balls and count by touching or moving one at a time. That makes it easier to connect each spoken number with one object.
No snow in the garden? Place two similar ice cubes in matching dishes, with one in a warmer spot and the other in a cooler spot. Ask children to predict which will melt first, then check them at regular intervals.
Suggested age: Preschool for observing; primary school for timing and recording.
Try this learning extension: Keep the ice cubes, dishes and starting time as similar as possible. Older children can record when each cube has completely melted and discuss what else might have affected the result.
Explain that this explores melting, which also happens to snow when it gains enough heat. Ice cubes are useful for the comparison, but they don’t have the same airy structure as a scoop of snow.
Bring the learning together with a homemade page divided into three spaces: “I think,” “I notice” and “I wonder.” Children can draw or write before and after an experiment, then add a question they would like to investigate next. This is an easy way to include early literacy without turning an enjoyable activity into a stack of worksheets.
Suggested age: Preschool through primary school.
Try this learning extension: Introduce a few useful words, such as melt, frozen, crystal, water, pattern and temperature. Let children use the words in conversation before expecting them to spell or write them independently.
If you’d like more background ideas to accompany your observations, CraftGossip’s Learning About Snow post is a useful next stop.
Yes. Paper snowflakes, pretend snowball counting, the fizzy snowman and snowstorm-in-a-jar activities all work without snowfall. Ice cubes can also help children explore freezing and melting, provided you explain how they differ from snow.
Start with paper snowball counting, supervised colour mixing or watching a small amount of snow melt. Keep the task short and let children describe what they see rather than expecting a written explanation.
Try: “Snow is made of tiny ice crystals that grow in cold clouds. When they fall and reach the ground without melting, we see snow.” You can build on that explanation as children ask more questions.
Paper snowflakes help children explore repeated patterns and symmetry, but they are craft models. Real snow crystals grow in three dimensions and occur in several forms, so compare your artwork with real photographs rather than expecting a perfect match.
You don’t need to turn every snowy moment into a formal lesson. Sometimes the most useful thing you can do is put out a clear container and ask, “What do you think will happen?”
Let children change their minds when they see the results. Let them repeat an experiment, make a wonky paper snowflake or spend longer than expected watching a drip form. Those little observations are often where the interesting conversations begin.
Whether you have a garden full of snow or a Queensland afternoon and a tray of ice cubes, there’s room for a little winter curiosity. Pick one activity, keep the supplies simple and enjoy discovering something together.
Leave a Reply