• Home
  • Suggest A DIY
  • DIY Newsletter

Lesson Plans

Ideas and resources

  • About CraftGossip
  • Our Network
    • Bath & Body Crafts
    • Candle Making Ideas
    • Crochet Ideas
    • Cross Stitch
    • Edible Crafts
    • Felting Patterns
    • Glass Art
    • Home & Garden Ideas
    • Indie Crafts
    • Jewelry Making
    • Kids Crafts
    • Knitting Patterns
    • Lesson Plans
    • Needlework
    • Party Ideas
    • Polymer Clay
    • Quilting Ideas
    • Recycled Crafts
    • Scrapbooking
    • Sewing Patterns
    • Card Making
    • DIY Weddings
    • Not Craft Ideas
  • Giveaways
  • Roundups
  • Store
  • Search

Mother’s Day Plant Pot Family Wind Chime for Kids – A Cute Keepsake Craft for Parents, Teachers, and Classrooms

April 11, 2026 by Shellie Wilson Leave a Comment

If you are looking for a Mother’s Day craft that feels a little more meaningful than the usual quick paper activity, this Plant Pot Family Wind Chime is a really sweet option. The original project uses terracotta pots in different sizes to represent family members, then adds painted faces, twine, beads, and foam message pieces to turn it into a hanging keepsake gift. It is one of those crafts that feels personal straight away, which is probably why it has such strong Mother’s Day appeal.

What I like about this one is that it gives kids the chance to make something that actually feels gift-worthy. Instead of sending home another flat craft that gets tucked into a drawer, this is the kind of project a mum or grandma might genuinely hang up and keep. Little people can have fun deciding who each pot represents, painting the faces, and choosing the colours, which gives the whole craft a lot of personality.

From a parent or teacher point of view, I would say this is best as a guided activity rather than a totally independent one. The project includes painting, sealing, threading twine through the pots, and securing beads and foam pieces, so it is better suited to older kids or younger children who have some adult help nearby. That said, it is still very manageable if you prep a few parts in advance, and I can easily see this working well for a small classroom group, a church craft session, or a Mother’s Day activity at home on the weekend. One of the comments on the original post even mentions it would be a good spring project for Sunday school kids, which feels very on brand for this kind of craft.

It also has that lovely slightly wonky handmade charm that makes kids’ crafts so special. Not every painted face will be neat, and not every pot will hang perfectly straight, but honestly that is part of what makes it feel made with love. Those are usually the crafts that end up meaning the most anyway.

This is definitely one of those crafts that takes a little more effort than a five-minute printable, but that extra effort is exactly what gives it keepsake value. For teachers wanting a memorable Mother’s Day project, or parents looking for something handmade and heartfelt, this one has plenty of charm.
«
»

Have you read?

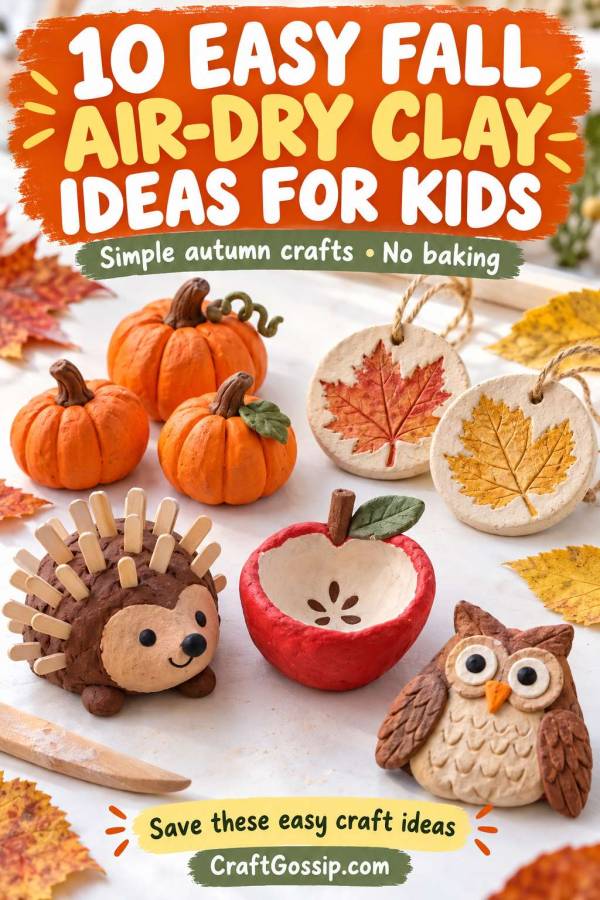
10 Easy Air-Dry Clay Ideas for Kids with a Fall Theme

There’s something about a lump of clay that gets children straight into making mode. Before you’ve finished putting the paintbrushes out, someone has made a pancake, someone else has made a suspicious-looking worm, and suddenly everyone has ideas. That’s a pretty good starting point for an afternoon of fall crafting.

Air-dry clay is especially handy because you don’t need a kiln or any baking. Kids can shape their projects, leave them to dry, and come back for a painting session later. Think little pumpkins, leaf decorations and woodland creatures with rather more personality than anything you could buy.

I’ve gathered ten fall air-dry clay crafts for kids, with straightforward projects for beginners and a few more detailed makes for children who enjoy taking their time. They’re lovely for autumn classroom activities, crafting with grandchildren, or a weekend afternoon when you fancy making something together.

And please don’t worry about perfectly smooth finishes. A slightly wonky owl is usually the one everyone falls in love with.

Before You Start

Choose air-dry clay labelled as suitable for your child’s age, cover the table, and have a rolling pin, blunt modelling tools and a damp sponge nearby. For painting, use age-appropriate craft paints compatible with your clay.

Treat these as two-session projects: shaping first, painting once everything has dried completely. Follow the drying guidance on the packaging, allowing extra time for thicker pieces or humid weather.

Finished air-dry clay makes are best kept as indoor decorations. Keep clay dishes away from food and water, supervise small accessories, and use battery-operated lights for any glowing decorations.

Leaf Impression Ornaments

These Clay Leaf and Nature Impressions from Crafty Art Ideas turn ordinary leaves into beautifully textured clay decorations. Children press leaves into rolled clay, then lift them away to reveal the veins underneath. It’s a lovely beginner project because the leaf does most of the detailed work, leaving kids free to experiment with shapes and colours. Add a hanging hole while the clay is soft if you’d like ornaments for an autumn branch display.

Little Clay Hedgehogs

The Clay Hedgehog Craft from Messy Little Monster is a cheerful choice for children who prefer making animals to decorations. A simple clay body becomes a hedgehog with eyes and colourful craft-stick spikes, so there’s very little complicated shaping involved. Younger makers can concentrate on rolling and pressing, with an adult supervising the small pieces. I rather like the idea of displaying the finished hedgehogs beside a few fallen leaves—it gives each little character its own woodland setting.

Apple Pinch Pots

These Apple Pinch Pots from Red Ted Art make a sweet introduction to pottery for school-aged children. Kids shape a small bowl with their thumbs, then add the details that turn it into an apple. The painted white centre and little brown pips are particularly charming, although children can choose their own apple colours. This is a lovely harvest-themed project for makers who want something they can display on a desk or give to a grandparent.

Folded Clay Owls

The Clay Owl Tutorial from One Little Project uses a simple folding technique to create wings and a recognisable owl shape. That makes it an approachable option for beginners who might find building a detailed animal from separate pieces a little frustrating. Feather textures and painted faces give children plenty of room to personalise their owls. Warm browns and oranges suit a fall display, but I wouldn’t argue with a purple owl if that’s where the afternoon takes you.

Sculpted Clay Pumpkins

Mont Marte’s Air-Dry Clay Pumpkin Tutorial offers a video-led project for families who like watching a demonstration before getting started. It’s a good choice for children ready to move from flat clay shapes into three-dimensional sculpting. I’d keep the first pumpkin manageable and let an adult help with any finer details shown in the video. A little collection would make a cheerful fall display, especially with each child choosing a different colour scheme.

Autumn Leaf Pinch Pots

These Leaf Pinch Pots from Red Ted Art turn a basic thumb pot into a leaf by shaping a pointed end and a small stem. They’re an appealing option for younger children crafting with help because there’s no intricate leaf outline to cut around. Painting them in yellow, rusty red or orange brings the autumn theme together. I’d choose this project for a mixed-age group, letting confident children refine their shapes while beginners enjoy the squeezing and smoothing.

A Clay Leaf Wall Hanging

The Clay Leaf Mobile from The Craft Train takes leaf impressions a step further, turning individual clay leaves into a hanging decoration. Children collect leaves, press their textures into clay and paint the dried shapes before they’re suspended from a stick. It’s particularly lovely as a family project, with everyone contributing a leaf or two. Adults can handle the final tying and hanging, while the children decide on the colours and arrangement.

Molded Clay Acorns

These Molded Acorns from Creative Paperclay use silicone molds and a lightweight air-drying compound to capture the acorn details. They’re worth trying with children who enjoy pressing materials into molds and revealing the finished shapes. You’ll need an acorn mold, and adults should handle any trimming or finishing required after drying. Painted in earthy autumn colours, the little acorns would look lovely scattered through an indoor seasonal display.

Standing Woodland Owls

Sculpey’s Air-Dry Clay Owl Figurine is a more sculptural alternative to the folded owl project. Children shape an oval body, pinch the top into ears and attach separate wings before adding painted details. I’d save this one for school-aged makers who enjoy working carefully, since joining and blending the wings takes a little patience. The finished owl makes a cute shelf decoration, and the tutorial includes photographs to help with the shaping.

Handprint Clay Ghosts

For a little Halloween fun alongside the pumpkins and leaves, try these Clay Handprint Ghosts from Celebrating with Kids. The project uses a child’s handprint to create a ghost keepsake, giving the decoration a personal touch. Younger children can help make the impression, with an adult assisting with the outline and handling the soft clay. Add the child’s name and year to the back, and you have one of those seasonal decorations that becomes more special each time it comes out of the cupboard.

Make a Little Fall Craft Display

You don’t need to tackle all ten projects to make something lovely. A few clay leaves, a pumpkin and one very proud little hedgehog can be quite enough for a windowsill or autumn nature table.

For a first clay session, I’d start with leaf impressions or a simple pinch pot. Put out a few materials, demonstrate the basic idea, and leave room for children to make their own decisions. Their finished projects may wander away from the example—and that’s often when the best little details appear.

The only part that needs a firm boundary is the drying shelf. Once everything is safely out of reach, you can look forward to the painting session without anyone “just checking” the clay every ten minutes.

Leave a Reply

Your email address will not be published. Required fields are marked *

Categories

Art Activities Christmas Classroom Craft by Holiday Craft Inspirations DIY Tutorials and Patterns Elementary Games Homeschool Kids Crafts Lesson Plan Activities & Ideas Math More Crafts Nature Preschool Printables Science Craft STEM & STEAM Toddler Tween

RSS feed: More Articles More Articles

  • Single and Loving It Spaghetti: Easy Bolognese for One
  • DIY Fire Pit: 10 Backyard Ideas You Can Make on a Budget
  • Crochet Christmas Dove Ornaments With a Printable Gift Poem
  • 5 Christmas Ornament Quilt Patterns That Add Instant Holiday Charm
  • 15 Christmas Cards Using Patterned Paper Scraps
  • 10 Christmas Stocking Knitting Patterns Worth Bringing Out Every Year
  • 8 DIY Wooden Bathroom Over-the-Toilet Shelf Ideas That Make Small Spaces Work Harder
  • 10 Easy Air-Dry Clay Ideas for Kids with a Fall Theme
  • Grinch Gunk Bath Slime – A Silly, Skin-Safe Christmas Soak for Kids
  • 14 Quick Handmade Gifts To Sew Before Christmas

Pick Your Blog

  • Sewing
  • Knitting
  • Quilting
  • Crochet
  • Home & Garden
  • Recycled Crafts
  • Scrapbooking
  • Card Making
  • Polymer Clay
  • Cross-Stitch
  • Edible Crafts
  • Felting
  • Glass Art
  • Indie Crafts
  • Kids Crafts
  • Jewelry Making
  • Lesson Plans
  • Needlework
  • Bath & Body
  • Party Ideas
  • Candle Making
  • DIY Weddings
  • Not Craft
  • Free Craft Projects

Copyright © 2026 · CraftGossip | Start Here | Contact Us | Link to Us | Your Editors | Privacy and affiliate policy